DIY Felt Mistletoe

As promised, here is a quick and easy way to make mistletoe for your home! IMG_6904One piece of felt

Stencil ( I drew mine, but you can find one here)

Marker

Scissors

Embellishments of your choice

Hot glue gun

Ribbon

IMG_6900Step 1: Trace the mistletoe stencil onto the felt.  I made two mistletoe sprigs – which means I needed one big mistletoe sprig and two smaller ones for each.

IMG_6891Step 2: Cut them out, baby.

IMG_6894

Step 3: Hot glue all three pieces at the top together.

IMG_6884Step 4: Hot glue embellishments onto your mistletoe.

IMG_6877Step 5: Hang and let the kissing commence!

DIY Lush Lip Scrub

You know that little shop called Lush? When you walk in and all of the sudden you realize your credit card limit isn’t quite large enough. Yes that one. The one full of all the homemade beauty goodness a princess would want.  Well, I decided that my budget couldn’t handle all of my Lush-y whims – so I did some investigating and it turns out that a lot of their products are simple to make. I guess that means my husband and I can stop eating Ramen for awhile 😉

IMG_6843Like I said, making your own fabulous lip scrub is super easy and only requires minimal ingredients – some of which I’m sure you have in your kitchen right now.

1 Tbsp. White Sugar

A Few Drops of Peppermint Essential Oil 

1 Tsp. Vanilla Extract

1/2 Tsp. Honey

2 Tbsp. Jojoba Oil

A Small Glass Jar

IMG_6846Mix all of the ingredients until you have a wet sugar consistency. Jojoba oil can be replaced by olive oil, but I decided to use Jojoba oil since that is what Lush uses.  Even though it is considered an oil, don’t be fooled, it will not clog your pores. Jojoba is a great moisturizer, reduces pores and wrinkles, keeps skin firm, and protects down to the deepest layer of skin. I have bought mine off of a vitamin website, but there are plenty of places you can find your own.

In order to use the lip scrub, scrub your lips with a little bit of the sugar (which I like to stick in the blender before I mix so it is ultra fine) and then wipe off. Put on your favorite lip balm and bam! Your lips will be thanking you 🙂

IMG_6854

Pom Pom DIY

IMG_5868Pom Poms are the perfect way to add a bit of spunk to not only your holiday decor, but also to a winter wedding! I love the ease of making these poms, and also how I can do anything  with them.  They can be strung to from garland, attached to dowels to become a sign or a pom bouquet, or scattered across a table to add a bit of quirk to your special day.

What you will need

Yarn – you can purchase a skein of yarn for about $2.50 from your local Walmart

Scissors

DIY Felt Flowers

IMG_5773In between raking leaves, drinking coffee with this amazing creamer, and rifling through boxes and putting our junk away, I’ve had the urge to make some garlands and itty bitty crafts for Christmas.  Don’t worry, there are a few Thanksgiving posts coming up, but I was too excited to not post this one!

Felt is a completely versatile material.  I’ve made bows, collars, and little stuffed animals from felt.  Today we’re trying our hand at making felt flowers!  I’m planning on using these as napkin rings, but for now, I’ve attached a pin onto the back of them.  Later I’ll pin them onto the ribbon I tie around the napkin.

The best part of making these is that they are kid friendly and very multifaceted. I’ve seen brides use these in topiaries, garlands, and even as hair accessories.

IMG_5763What you will need:

4 pieces of felt (any color)

Scissors

A candle or other small circular object to trace

Marker

Hot glue gun

Holiday cheer

PicMonkey CollagewhitflowerIn order to make the small, white flowers, you will need to begin tracing the candle with a marker.  I used red because I wanted to keep the color on the outside after I cut it.  It looks very “candy cane-esque.” You will be able to get at least 16 small circles onto one sheet of felt (about 1.5 inches in diameter).

IMG_5746

The felt can be purchased at any craft store, I had a surplus leftover from a previous craft project.  I believe I bought this from Wal Mart for $0.25 a sheet.

IMG_5741Next you will begin to hot glue the petals.  Take a circle, keep it flat.  This will be your base.  Begin to fold the circles into fourths and glue at the tip of them.  I liked to fold it in half, glueing in a small dot into the middle, fold again, glue in the middle, and then glue it to the base.  Keep folding until you have 4 petals.  I stopped here and then glued a small pearl taken from an old costume jewelry necklace.  If you want to give your flower a more full, pom-pom effect, keep adding petals!

PicMonkey CollageredflowerThe red ones are a hoot to make! Take your felt and cut it into four pieces.  The purpose of this makes it easier to manipulate the felt while you cut.  Starting with the outside begin to make scallops in a circular patters, making sure that your scallops don’t match up (if each row of scallops is the same as the last, your flower will not have much dimension).

Once you have finished cutting, take our your hot glue gun, roll the middle into itself and glue.  Then you may begin wrapping the rest of the flower around the center.  I like to glue every third wrap, just to make sure the flower doesn’t fall apart.  I also added a pearl to the center of this flower!

IMG_5779On the back, I added a small green, felt leaf for a spring of color.  I also glued a pin onto the back.  This way, when the flowers are not in use as napkin rings, I can put them on the lapel of may jackets or even in my hair!

IMG_5771Such a quick, easy way to liven up anything from a wedding to a small, family dinner!  Happy crafting!

Hanging Plate Wall DIY

Flipping through a Country Living magazine a few years ago, a certain image caught my eye.  My heart ooo-ed and ahhh-ed as my brain shouted “I HAVE TO HAVE THIS!”  Immediately, I headed off to Goodwill with nothing more than the desire to find some beautiful china to hang in our very-distant-future home.

word-plates-on-wall-country-livingI came back, so proud, with a beautiful stack of china – only to realize I would have to pull it out of a box to admire it……and that I could potentially be making our home look like it needed some mothballs, frozen dinners, and an 80 year-old living in it. So packed away it went untilllllllllll we got hitched.  We eloped to Paris, TN on June 9 – just like we planned to do on our first non-date-date (no sweat, dear reader I will be overjoyed to share our love story with you, if you want ;)). We had a small get-together with friends and family to celebrate and used the china for the various foods and desserts.  I thought to myself, I am definitely using this china now.  What a beautiful way to remember the very first moments we had as husband and wife, than by hanging the china we used to serve the people closest to us.

The DIY projects we have conquered so far have been easy as pie.  They have taken very little time AND money – and I love the way they look.  Tyler always teases me saying I want a little bit of every style, and its true! There isn’t a label for my style (unless you count indie-grandma-chic a style).  I simply purchase items that make me feel happy.

What we did to complete our china quote wall:

1. I chose a quote I wanted to have on the plates.  Since “Just Do It” has been our mantra since our first New Year’s resolutions together it seemed fitting that we wrote that.  We took an Elmer’s paint pen and carefully illustrated the quote.IMG_4876

2.  Take Gorilla Glue, $8.00, at Lowes and sawtooth picture hangers, $3.50, also at Lowes.  Wet both the back of the plate and the picture hanger, dab on a little of glue and wait 2 hours for the glue to dry.  You will have to wait a full 24 hours for it to completely cure.IMG_4880

3.  Gorilla glue activates with moisture.  If its put on excessively, it will foam up/expand too much and you won’t be able to hang up your plate, so be careful!

4.  Begin to layout and hang up your plates!chinaplatediy

Look below for some great inspiration. (All of these photos can be found on pinterest)

0ef5b706b3bfd808ef55a802aae235a6 7ea87c1619087c4c69a3e593a6644676 fd745e80a7d7712ddb7054d0993ae9e8 d9ac577433062a0ed1fd840e354d1d65 a055e95873fee773a2140517c8c267f8

DIY Chalkboard Cabinet Fonts

IMG_4889

It is no surprise to our friends and family that Tyler and I have a huge love for books.  I would not be exaggerating if I stated we could build a house from all the books we own.  Looking down into the future, we even joked about opening up a little coffee shop/bookstore and naming it “Cafe Diem.” However, we quickly realized that by the time we could open up a coffee shop/bookstore and name it “Cafe Diem” we would probably want to be spending time with our grandchildren. Or on a beach.  So we made it work for us. We brought Cafe Diem into our own home! (By the way, I’m sorry about my excellent photography skills. One day I’ll get the hang of lighting and focusing, but for now I’m occupied on first grade common core standards and managing nineteen sic year olds). 

Painting and stenciling our own cafe board was much easier than I had anticipated!  I am going to say, I am very pleased with it’s look and will not be changing it anytime soon.  The first thing we did was sand down the cabinets and apply the chalkboard paint.  You can buy it at any local department store, but we found ours for around $10.00 at Lowes.  We used the whole quart can, applied coat after coat, and then covered the whole cabinet area in chalk to “prime” it.  If you don’t rub the whole area with chalk first, when you go to erase your first message it will often stay put! So, if you are leaving your chalk on permanently, forever and infinity, go right ahead and skip this step.

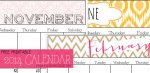
Once we sanded, painted, and primed, I picked out the fonts I wanted to use from www.dafont.com. I created this little document here to use for the stencils.

Untitled copy

You will notice that under each day of the week, we have what the menu will be for that day! My perspective on life is “if you have a strong routine, you can be more flexible!” And that is what we are aiming for. So we have structured our days in the genre of cuisine we want for that day, but not so much that we can’t have fun with it.

Then began the hard work. Call me odd, but using chalk made me want to listen to Mumford & Sons and Mumford & Sons only. So whilst playing music that let me dive into my artsy soul, I chalked and chalked and chalked away. Our countertop soon looked like it had a light dusting of snow and I resembled Casper the Ghost more than a 22-year old wife, but the job was completed! And here is how:

chalkboard font diy

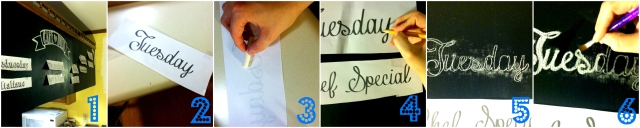
1. I posted up all of the fonts into the design that I wanted.  That banner that says Cafe Diem was a craft all on its own.  If you have never bought graphics from GraphicMarket on Etsy, you have not liiiiiiiiiived, I tell ya. Their store is my go-to if I’m trying to make a printable.  I bought their laurel and ribbon design for $4.50 and then created a poster out of the ribbon using www.blockposters.com.  I stuck the ribbon up with the font taped on top of it and followed the steps below.

2. Take the “stencil” down.

3. Rub that backside down with chalk. Be generous! I found it was easier to pour on the chalk and then clean up the mess, than give it a light swipe and hardly see the outline.

4. Put the stencil back up and trace over it with a pencil.  If you are imagining your middle school self sitting in art class rubbing a picture down with lead and then tracing it, you have the right idea! Or perhaps that was only me, since I can’t draw worth a dime.  Just be careful not too apply too much pressure, you only want to transfer the chalk, not embed your message for years to come.

5. Da-daaa-daaaaaa! You have transferred your first word, now fill it in with the chalk.  If you want a really bright white line dip your chalk into water, or use a paint brush and lightly dampen the surface you are about to chalk.

6. Use a paintbrush, q-tip, or paper towel to clean up any smudges. It works like a perfect eraser!

7. Revel in the beauty of your masterpiece, Michelangelo.

There you have it, plain and simple!
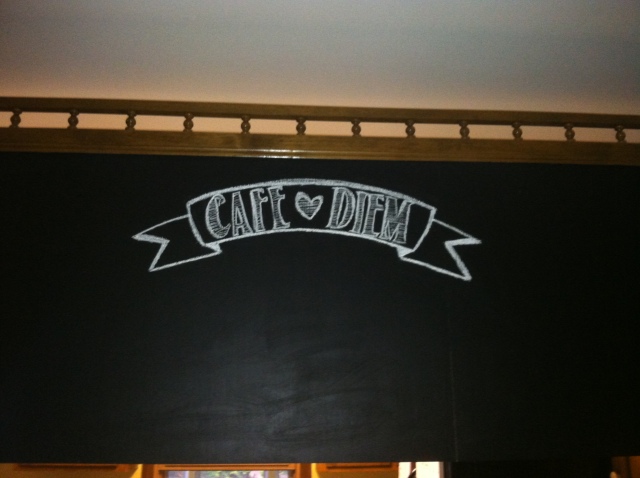
 IMG_4810

Ta-Da!

These last few days we have accomplished so much in our home.  I keep looking around feeling like I haven’t done much, but then I take a gander at my computer and see how much organization and planning we have accomplished.  We finished our household binder today.  Not much else was added to it, but we did find some solid resources to use while researching.  For one, www.moneysavingmom.com is ah-mazing.  Amazing times 349,902.  Brainstorming what we need to put into our binder, making it, and then formatting it proved to be more time consuming than I was originally hoping.  Was it worth it? Yes, because it will last us for years to come. MSM, however, has customizable printables you can use to make your own binder.  So forget having to figure out how to group and arrange things in a powerpoint document, she has it ALL done for you! Thank you Money Saving Mom! Here are some other resources (click them, please!) we ended up drawing upon for some inspiration:

householdbinderprintables HouseholdFamilyBinderPart1 Household-Binder.v.w

Aren’t they beuts? So without further ado, here is our binder.  It’s simple, but effective.  Inside the binder you will find our mission statement.  This year we are B-I-G into getting clear and concerned about our goals, who we are as a couple, and what is important to us. Franklin Covey has their own mission statement builder to help you along with creating your own.  They even provide bits and bobs of inspiration while you’re answering the questions.  We really loved how ours turned out, so we tweaked it a little and gave it the big ole’ Buis seal of approval.  Next, you’ll find the table of contents.  To be honest, I only added the table of contents because we’re composing lessons with more informational texts and I would have felt so wrong. SO WRONG, friends. not including it. As you flip through some more of the pages, you will notice that on some of our “title pages” there are no text behind them – that’s because we plan on having an empty page protector where we can put the information into it, like our coupons and ads. For the calendar section, we printed ours off at www.filthymuggle.com.  They will also be in a page protector so we can use erasable markers on them.

Buis Household Binder

Since we are in the beginning stages of getting organized, I feel like our binder isn’t as thorough as it needs to be, yet. I’m not going to be shy, but we haven’t entirely figured out everything we’ve gotten ourselves into with being homeowners.  We are still fixing and changing our budget to accommodate different bills.  We are still learning the best places to shop for what deals and what chores need to be done and when.  We will soon get into a routine, but for now we have left plenty of room for improvement.  Like I promised, if you want to download your own binder (change, alter, delete whatever you want), you can do so here.

And please, if you have any suggestions, let us know! More minds are better than two 😉